Start here · 5 min read
AI Automation for Beginners: Your First Workflow in n8n, Free
Three nodes and a free AI model on your own computer. Every screenshot below is from the run we did, not a mock-up.
“AI automation” sounds bigger than it is. At its smallest, it’s three steps: something comes in, an AI model looks at it, and an answer goes back out. Once you’ve built that once, every bigger workflow is the same idea with more steps.
This guide builds exactly that, in n8n, with a free AI model running on your own computer. Nothing here needs a paid account or an API key.
One honest line: as of November 2026 the business behind this site has earned $0. This is a skill you can learn and test for free, not a promise that it pays.
What you’ll build
A tiny message sorter. You send it a customer message, it asks the AI to label it Question, Complaint or Other, and it sends the label back.
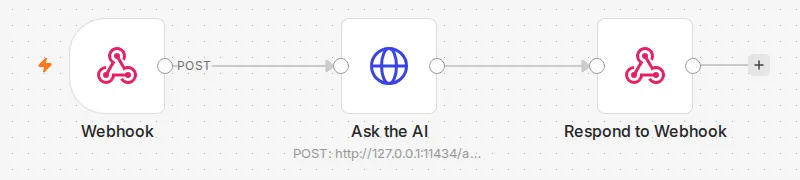
Three nodes:
- Webhook: the door. It gives the workflow a web address that a message can be sent to.
- Ask the AI: an HTTP Request node that sends the message to the AI model on your computer.
- Respond to Webhook: sends the label back to whoever sent the message.
What you need (all free)
- n8n, the tool that chains the steps together. We run it on our own computer; n8n’s own guide is Hosting n8n. If you’d rather not install anything, n8n Cloud runs it for you on a paid plan. We don’t use it ourselves, so we can’t tell you how it compares. One catch: n8n Cloud can’t reach the
127.0.0.1address of a model on your own computer, so this exact guide is for the self-hosted version. - Ollama, which runs AI models on your own computer: ollama.com.
- A small model. We used
qwen3:4b-instruct(Apache 2.0 licence, so free to use in things you sell). Once Ollama is installed, get it with:
ollama pull qwen3:4b-instruct
Check Ollama is running before you start. This should list the model:
curl http://127.0.0.1:11434/api/tags
Step 1: the Webhook
In n8n, make a new workflow and add a Webhook node. Set it like this:
- HTTP Method: POST
- Path:
first-workflow - Respond: Using ‘Respond to Webhook’ Node
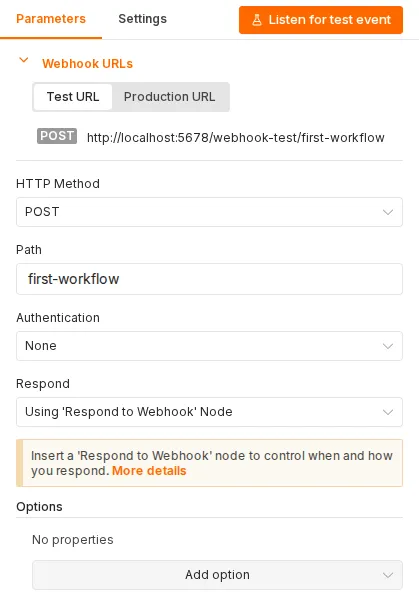
That last setting matters. It tells n8n to wait for the third node before it answers, so the answer can include the AI’s label.
Step 2: Ask the AI
Add an HTTP Request node after the Webhook and rename it Ask the AI. Set:
- Method: POST
- URL:
http://127.0.0.1:11434/api/generate(Ollama, on the same computer as n8n) - Send Body: on, Body Content Type: JSON, Specify Body: Using JSON
- JSON: switch the field to an expression and paste:
{{ JSON.stringify({ model: 'qwen3:4b-instruct', stream: false, prompt: 'Sort this customer message. Reply with exactly one word: Question, Complaint or Other.\n\nMessage: ' + $json.body.message }) }}
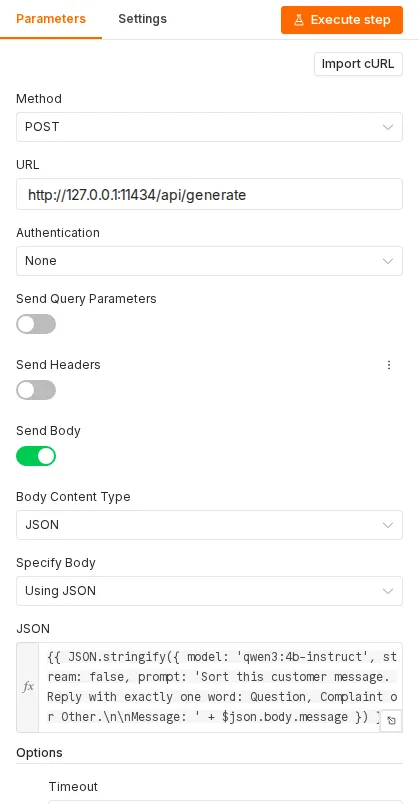
Two things in that line do the work. $json.body.message is the message that arrived at the Webhook. stream: false asks Ollama for the whole answer at once, which is easier to use in the next step.
We also set the node’s Timeout option to 120000 (two minutes), because the first call can be slow while the model loads.
Step 3: Respond to Webhook
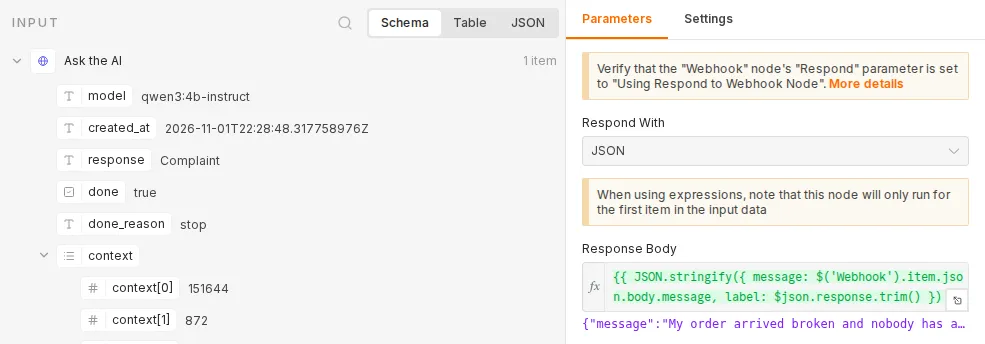
Add a Respond to Webhook node. Set Respond With to JSON, and the Response Body to this expression:
{{ JSON.stringify({ message: $('Webhook').item.json.body.message, label: $json.response.trim() }) }}
$json.response is the model’s answer. .trim() removes any stray spaces or line breaks around it.
Step 4: turn it on and send it a message
Save the workflow and click Publish, top right (that’s what it’s called in n8n 2.35.7, the version we used). Then send it a message from a terminal:
curl -X POST http://localhost:5678/webhook/first-workflow \
  -H "Content-Type: application/json" \
  -d '{"message": "What time do you open on Saturday?"}'
It answers with the message and its label. While you’re still building, the Webhook node’s Listen for test event button gives you a test address (/webhook-test/first-workflow) that works without publishing.
What happened when we ran it
We sent six messages on 1 November 2026, on n8n 2.35.7 and qwen3:4b-instruct. Each one is a saved run in n8n:
| Message | Label it gave |
|---|---|
| What time do you open on Saturday? | Question |
| My order arrived broken and nobody has answered my email for a week. | Complaint |
| Do you deliver to the north side of town? | Question |
| The app logged me out three times today, this is really annoying. | Complaint |
| Thanks, see you next week! | Other |
| hi | Other |
All six labels are the ones we’d have picked. That’s six easy messages, not a real test, so don’t read it as “it’s always right”.
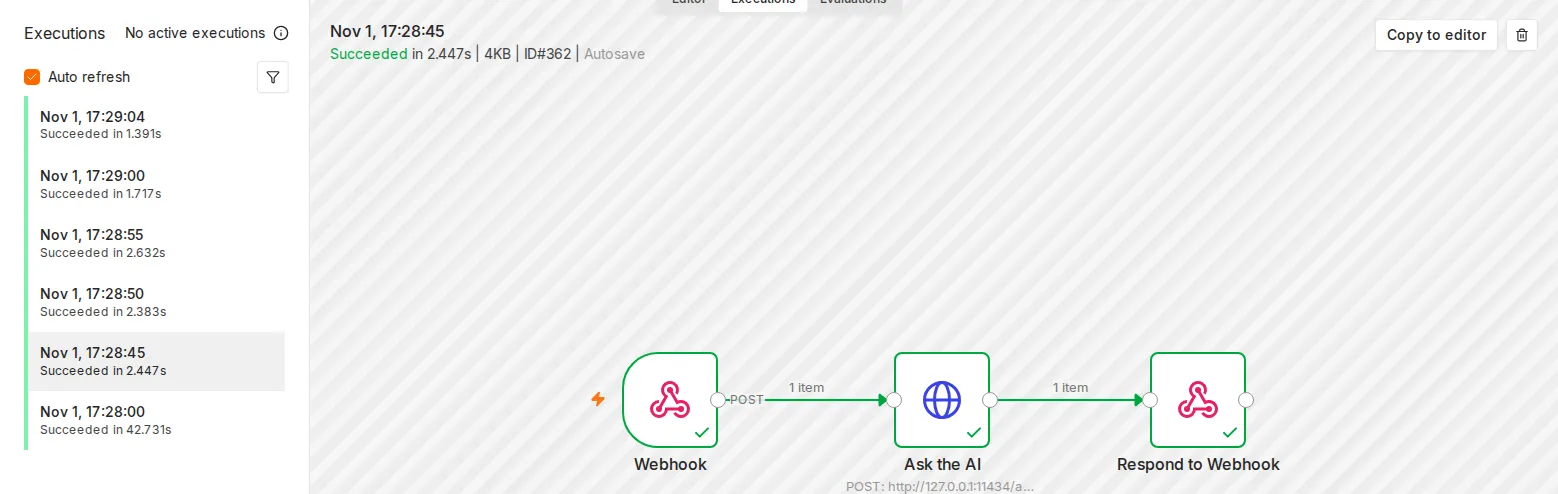
Speed: the first run took 42.7 seconds, because the model had to load into memory, and our computer was busy making videos at the time. The other five took between 1.4 and 2.6 seconds.
What it can’t do
- Nothing checks the answer. If the model replies with something other than one of the three words, that’s what you get back. Add a check before you rely on it.
- Small models lean one way on unclear messages. On a similar four-way sorter, this same model called a meetup invitation “Support”. Clear messages are easy; vague ones are where it goes wrong. Your own examples in the prompt help more than a bigger model.
- It doesn’t read anyone’s inbox. It labels whatever you send it. Connecting it to real email or chat is the next step, and a bigger one.
- There’s no lock on the door. The Webhook has no authentication, so anything that can reach that address can use it. On your own computer that’s only you. Don’t open it to the internet like this.
- Your computer has to be on, with both n8n and Ollama running.
Where to go from here
Swap the prompt and you have a different tool: summarize a message, pull out a date, draft a reply. The three nodes stay the same.
If you want to see a bigger version, our Telegram support bot is the same idea with more steps: it answers from the owner’s notes, and when a message should go to a person, it hands it over and stays quiet.
Not sure what to build toward? The 2-minute quiz picks one starter path for you, with this week’s three steps.